
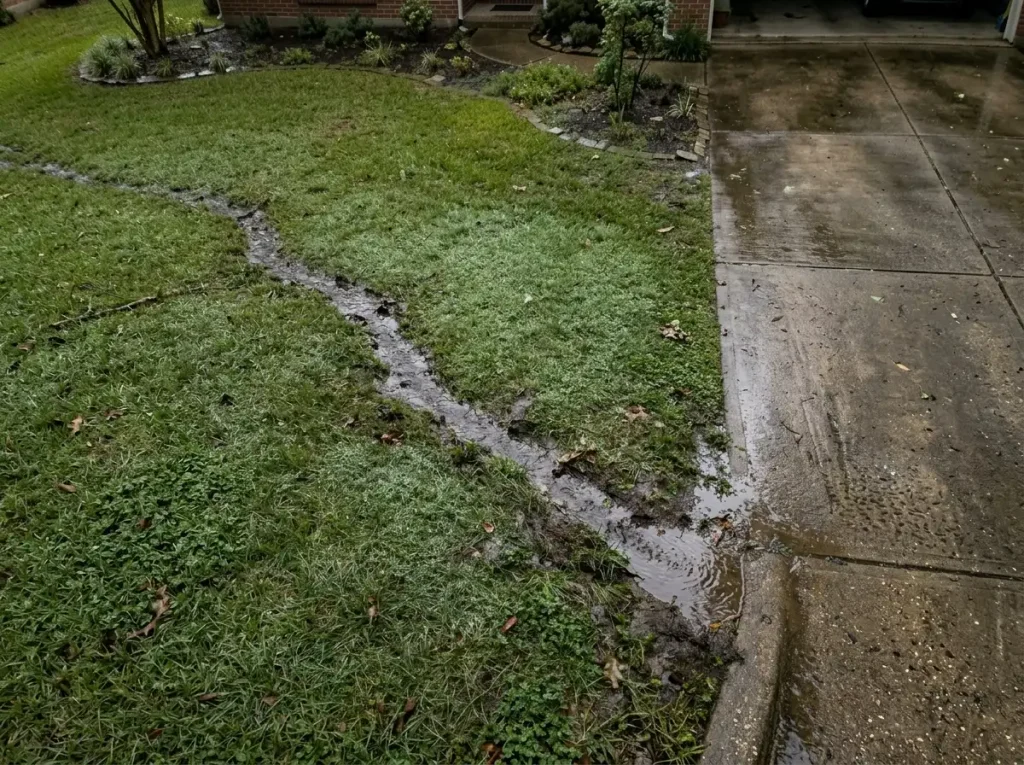
Your yard is soaking wet after every storm. Water pools near your foundation. The flower bed along the driveway washes out every spring. You’ve ignored it long enough.
Here’s the thing most people don’t know: you can fix a real drainage problem AND add one of the most beautiful features in landscaping — at the same time. A dry creek bed does both.
This guide covers everything. Planning, sizing, rock selection, costs, build steps, and what actually keeps it looking good years later.
Do You Actually Need a Dry Creek Bed?
Not every wet yard needs the same fix. Before you dig anything, spend five minutes after the next rain. Watch where water collects and where it flows.
Ask yourself three questions:
- Does water pool in one spot, or does it flow across your yard?
- Is the wet area near your foundation, a driveway, or a downspout?
- Does your yard have a natural slope — even a slight one?
If water flows across your yard in a channel — even a shallow one — a dry creek bed is your best option. It works with the natural flow instead of fighting it.
If water just sits in one flat spot, a dry creek bed won’t help much. You’re better served by a catch basin or a rain garden that absorbs water in place.
If your problem is a downspout dumping water against your house, a dry creek bed connected to a pop-up emitter is the cleanest fix available.
Still unsure? Check our full guide on how to fix drainage around your house for a complete decision breakdown.
What a Dry Creek Bed Actually Is (And Isn’t)
A dry creek bed is a stone-lined channel that mimics a natural stream. It has no water in it most of the time. But when it rains, it guides runoff safely away from problem areas.
It works because of shape and slope. Water follows the path of least resistance. You’re creating that path intentionally — with gravel and rocks — so water goes exactly where you want it.
Two Reasons People Build Them
Drainage is the practical reason. Water gets channeled away from your foundation, driveway, or soggy lawn area. Erosion slows down. Topsoil stays put.
Aesthetics is the other reason. A well-built dry creek bed looks genuinely beautiful. It adds texture, depth, and a natural focal point to any yard. In winter, it still looks intentional. In summer, plants along the edges make it look like it was always there.
The best part? You don’t have to choose. One project delivers both.
Planning Your Dry Creek Bed: The Steps Before You Dig
Good planning saves hours of frustration later. These decisions matter more than any individual build step.
Read Your Yard’s Natural Water Flow
Don’t design the path with a pencil on paper first. Watch your yard during or after rain. The water is already telling you where it wants to go. Your dry creek bed will look more natural — and work better — if it follows that existing path.
Mark the starting point (where water enters or collects) and the end point (where it can safely drain). Usually that’s a low spot in the lawn, a sidewalk edge, or a street-level drain.
Check Local Rules Before You Dig
In most areas, no permit is needed for a residential dry creek bed. But two things matter:
- Call 811 before digging. It’s free. It marks underground utility lines. Hitting a gas or water line is extremely expensive and dangerous.
- Check HOA rules if you have one. Some HOAs restrict water redirection to public streets or shared drainage systems.
Sizing Your Creek: The Width-to-Depth Formula
This is the single most skipped step — and it’s why some dry creek beds overflow during heavy rain.
The rule: your creek should be twice as wide as it is deep.
A 12-inch deep creek needs to be 24 inches wide at the top. A 6-inch deep creek needs to be 12 inches wide. This 2:1 ratio matches how natural stream channels form and gives water room to flow without spilling over the edges.
For most downspout drainage projects, 6 to 8 inches deep and 18 to 24 inches wide handles normal residential runoff. If you’re managing water from a large roof area (over 1,500 square feet), go deeper — at least 12 inches — and at least 30 inches wide.
The creek must also slope continuously from start to end. A 1% slope (1 inch of drop per 8 feet of length) is enough. Without slope, water stalls.
How Much Does a Dry Creek Bed Cost?
This is the question everyone wants answered before they start. Here’s an honest breakdown.
| Project Size | Length | Est. Materials Cost | DIY Labor | Total DIY Cost |
|---|---|---|---|---|
| Small | 10–15 ft | $80–$180 | 4–6 hours | $80–$180 |
| Medium | 25–35 ft | $200–$450 | 8–12 hours | $200–$450 |
| Large | 50–70 ft | $500–$1,100 | 18–28 hours | $500–$1,100 |
What drives the cost up:
- Larger decorative boulders ($30–$80 each at a rock yard)
- Premium river rock vs. standard gravel
- Landscape fabric quality (don’t skip this — cheap versions fail within two years)
- Renting a compactor for large projects ($50–$80/day)
What keeps costs down:
- Sourcing rock locally from a stone yard instead of a big box store (often 30–50% cheaper per ton)
- Using smaller boulders you can move yourself
- Doing it over two weekends instead of rushing
One note: if you hire a landscaper to build it, budget $800–$3,500 for labor depending on length and complexity.
Tools and Materials You’ll Need
Nothing exotic here. Most of this is likely already in your garage.
Tools
- Shovel (a flat spade for edges, a round point for digging)
- Wheelbarrow
- Garden rake
- Hand tamper or plate compactor (rent for large projects)
- Utility knife or heavy scissors
- Landscape marking paint or two garden hoses
Materials
- Heavy-duty landscape fabric — not a thin weed barrier. Look for non-woven geotextile fabric rated at 3–5 oz per square yard. It lasts 15–20 years.
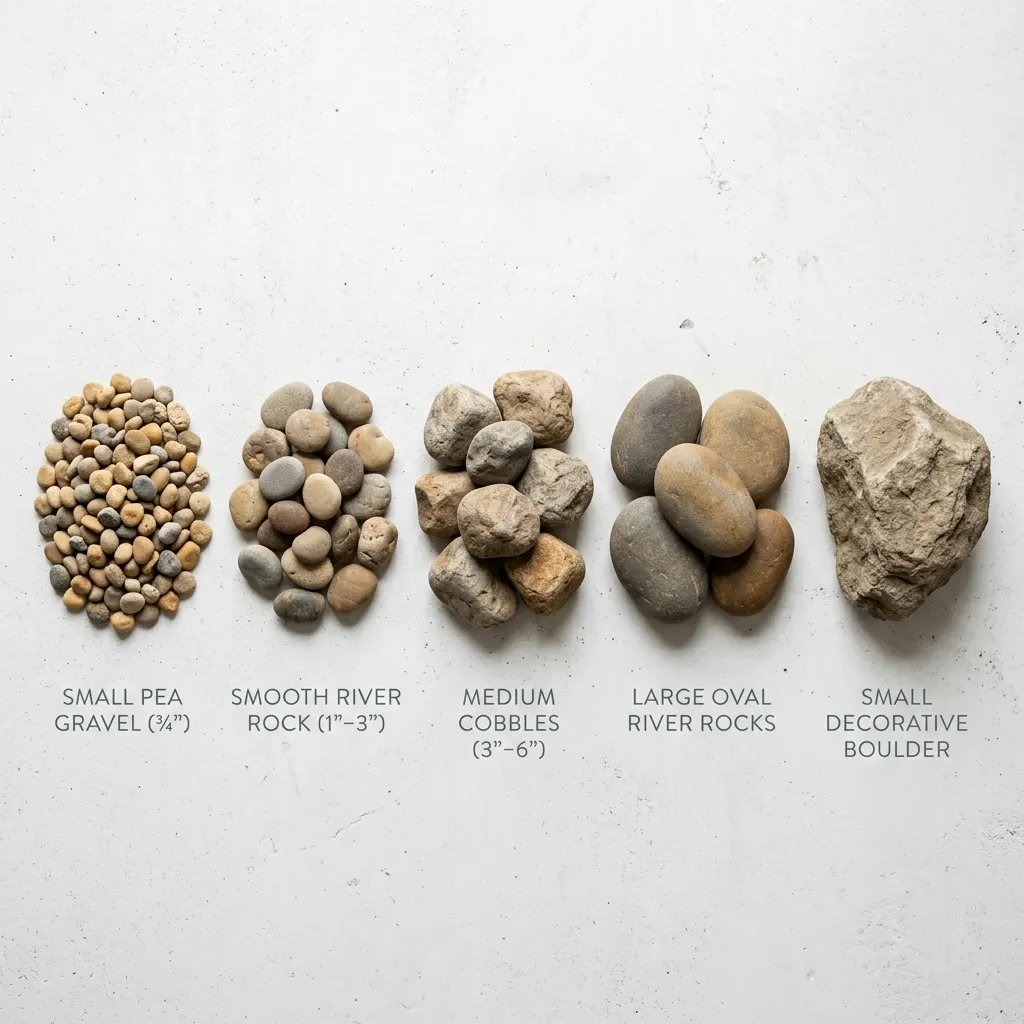
- Pea gravel or fine crushed stone — for the base layer under larger rocks
- River rock (1″–3″) — for the main fill of the creek channel
- Cobbles (3″–6″) — for edge definition and natural variation
- Boulders (6″+) — for focal points, curves, and visual anchors. Two to four per project is usually plenty.
- Landscape fabric pins — to secure fabric before rocks are placed
Choosing the Right Rocks: A Size Guide
Rock selection is where dry creek beds succeed or fail aesthetically. Natural streams don’t look uniform. Yours shouldn’t either.
The Layering System
| Zone | Rock Size | Purpose |
|---|---|---|
| Base layer | ¾”–1″ pea gravel | Drainage, holds fabric down |
| Creek center | 1″–3″ river rock | Main fill, water flow surface |
| Creek edges | 3″–6″ cobbles | Edge definition, visual framing |
| Accent boulders | 6″–18″+ | Curves, focal points, natural feel |
Tip from real builds: Partially bury your largest rocks — at least one-third of them underground. Rocks sitting fully on top look placed, not natural. Buried rocks look like they’ve been there for decades.
Rock Colors That Work
Stick to one dominant color with one accent. Natural creeks don’t have rainbow stones. Common choices that look great:
- Gray basalt + white quartz accents — clean, modern, works with most architecture
- Warm tan river rock + rust-colored cobbles — natural, earthy, suits cottage and traditional homes
- Dark charcoal with pale smooth pebbles — sleek, contemporary, great for xeriscape yards
How Much Rock Do You Need?
Use this rough formula:
Tons needed = (length in feet × width in feet × depth in inches) ÷ 1,000
Example: A 30-foot creek, 24 inches wide, 8 inches deep: (30 × 2 × 8) ÷ 1,000 = 0.48 tons of main fill rock, plus about 30% more for edges and accent stones.
Most local stone yards sell by the ton. Buy 20% more than you calculate — you’ll use it.
TheDaileyHouse Tool
Dry Creek Bed Planner
Enter your project details below. Get your recommended dimensions, rock quantities, and estimated cost in seconds.
Project Dimensions
Rock Style
Add-Ons
📐 Recommended Dimensions
Cost Estimate
How to Build a Dry Creek Bed: Step-by-Step
Step 1: Mark the Path
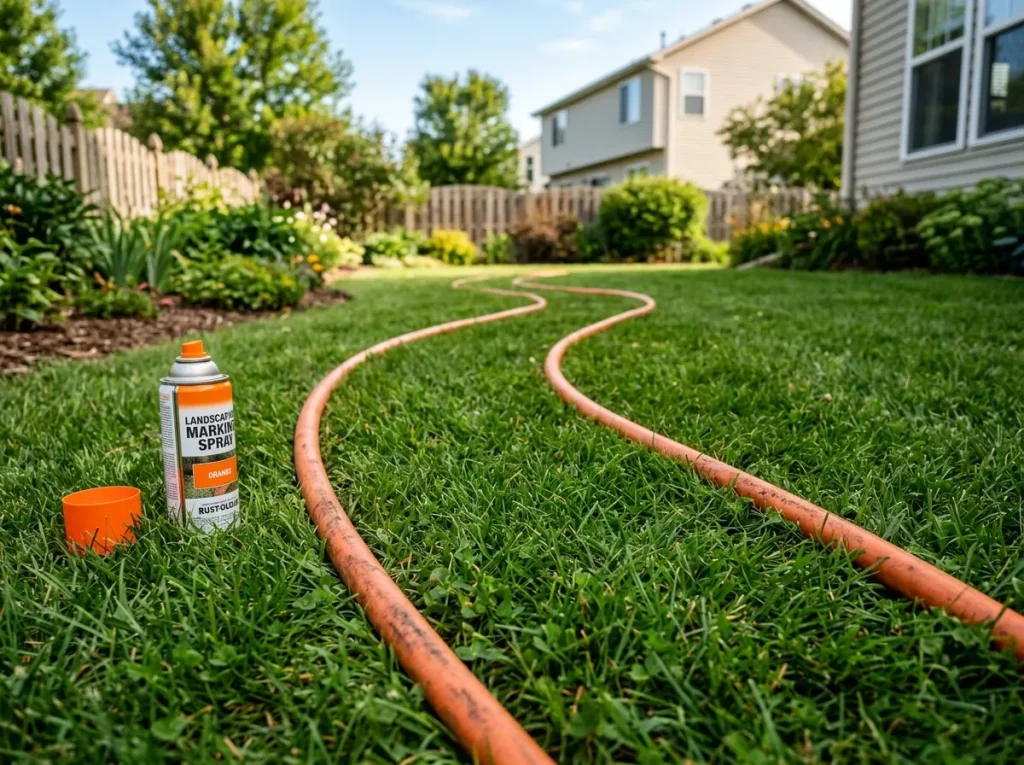
Lay two garden hoses along the planned path. Step back and look at it from different angles. Walk toward it from the front door, the driveway, from inside the house.
Natural stream beds widen at curves and narrow in straight sections. Adjust your hoses until it looks like water shaped it — not like you measured it with a ruler.
When you're happy, spray marking paint along the inside of each hose to lock in your lines.
Step 2: Connect Your Downspout (If Applicable)
If this creek bed is handling downspout runoff, do this before digging the main trench.
Extend the downspout with a corrugated pipe buried just below grade. Lead it to the planned "headwaters" of the creek — ideally emerging from behind a large boulder or a cluster of plants. This disguises the functional inlet and makes the whole thing look natural.
Cap the pipe with a pop-up emitter at the surface. Water pushes the cap open during rain and closes when it stops, preventing rodent entry.
Step 3: Dig the Trench
Remove grass and topsoil along your marked path. Dig 6 to 12 inches deep depending on your calculated depth. Shape the trench as a concave bowl — deepest in the center, sloping gently up to the edges.
Use excavated soil to build up slight banks along the edges. This looks more natural and keeps water from spilling sideways.
Compact the bottom of the trench firmly with a tamper. Loose soil shifts under the weight of rocks and water, destabilizing the whole structure.
Step 4: Lay the Landscape Fabric
Unroll landscape fabric across the entire trench, pressing it into the concave shape. Let it hang 12 inches over each side — you'll trim the excess after rocks are placed.
Secure edges with landscape pins every 12–18 inches. Overlap strips by at least 6 inches where pieces meet.
Do not use thin plastic sheeting or cheap weed barrier here. It breaks down in two to three years under UV exposure and rock weight. Proper non-woven geotextile fabric lasts 15+ years.
Step 5: Add the Base Layer
Cover the fabric with 1 to 2 inches of pea gravel or fine crushed stone. This base layer holds the fabric in place, prevents fine soil from migrating up through rocks, and adds an extra drainage buffer.
Step 6: Place Your Boulders First
Set accent boulders before filling with river rock. Position them at curves, near the inlet, and near the outlet. Bury them one-third deep. Step back often.
Boulders at the outside of curves look most natural — real water deposits large stones on the outer bank where velocity slows.
Step 7: Fill With River Rock and Cobbles
Add cobbles along the edges first, then fill the center with river rock. Use varying sizes and avoid creating patterns — natural stream beds are random. Occasionally add a slightly larger stone into the center fill to break up uniformity.
Work the edges so rocks graduate in size from the center outward: smallest in the middle, medium cobbles at the edge, larger accent pieces at the border.
When rocks are placed, trim excess landscape fabric flush with the outer rock line. Any fabric left exposed will deteriorate within a season.
TheDaileyHouse · DIY Guide
How to Build a
Dry Creek Bed
7 Steps · Drainage + Curb Appeal- 1Mark the Path
Lay two garden hoses in a natural curve. Lock the lines with marking paint when the shape looks right.
- 2Connect the Downspout
Run a corrugated pipe underground to the headwaters. Hide the inlet with a pop-up emitter behind boulders.
- 3Dig the Trench
Excavate 6–12 inches deep, concave-shaped. Build up soil banks at the edges. Compact the bottom firmly.
- 4Lay Landscape Fabric
Use heavy-duty geotextile only — not thin plastic. Overlap strips 6 inches. Lasts 15+ years properly installed.
- 5Add the Base Layer
Cover with 1–2" of pea gravel. Anchors the fabric in place and adds an extra drainage buffer below the rock.
- 6Place Boulders First
Set accent boulders at curves and inlets. Bury one-third deep. Outer-bank placement looks most natural.
- 7Fill with River Rock
Smallest in the center, larger cobbles at edges. Avoid patterns — stay random. Trim excess fabric flush when done.
Plants That Make It Look Completely Natural
Rock alone looks man-made. Plants soften the edges and pull the whole feature into the landscape.
Drainage-Tolerant Plants (Wet Conditions)
These plants handle occasional flooding along the creek edges:
- Blue flag iris — dramatic vertical interest, tolerates wet soil
- Cardinal flower — bright red blooms, attracts hummingbirds
- Sedge grasses — low maintenance, year-round texture
- Joe-Pye weed — tall background plant for slopes
Drought-Tolerant Plants (Dry Between Rains)
The creek is dry most of the time. Edge plants need to handle both extremes:
- Black-eyed Susan — tough, cheerful, spreads naturally
- Catmint — soft purple blooms, deer resistant
- Ornamental grasses (Karl Foerster, Little Bluestem) — move with wind, frame the rocks beautifully
- Creeping thyme — fills gaps between rocks at edges, fragrant, walkable
One rule: Use native plants whenever possible. They're already adapted to your local rain patterns. They need less water, less intervention, and look more natural in a naturalistic feature like this.
Four Dry Creek Bed Design Styles
The same basic structure takes on completely different personalities depending on material choices and plantings.
Japanese / Zen Style Smooth dark river rock in the channel. White gravel in the surrounding bed. Minimal, asymmetric boulder placement. Paired with ornamental grasses, bamboo, or Japanese forest grass. Clean and contemplative.
Woodland / Naturalistic Style Rough, irregular fieldstone edges instead of smooth river rock. Larger boulders, moss-covered if possible. Surrounded by ferns, native wildflowers, and shade-tolerant ground covers. Looks like a real forest creek.
Cottage Garden Style Smaller, warm-toned pea gravel and rounded river rock. Softened edges with low-growing perennials — catmint, lavender, coreopsis — spilling over the stone edges. Charming and informal.
Desert Xeriscape Style Large dry-wash cobbles and decomposed granite. Dramatic boulders. Surrounded by ornamental grasses, agave, or native sage. Striking even without a single drop of rain.
Mistakes That Kill the Look (And the Function)
These are the errors that show up six months after the build — when it's harder to fix.
Too shallow a trench. A 3-inch deep creek overflows during moderate rain and looks flat. Minimum 6 inches. More if you're managing significant runoff.
No slope. Water needs somewhere to go. Without a continuous downhill grade, you get standing water between storms — a mosquito breeding site, not a feature.
Wrong fabric. Thin plastic sheeting or cheap weed barrier disintegrates fast. Rocks shift. Weeds come through. Use proper geotextile fabric.
Rocks that are too small. River rock under 1 inch washes away during heavy rain. It also looks more like a path than a stream. Use a mix of sizes with nothing smaller than ¾" gravel in the center.
Too uniform. All the same-sized rocks, all the same color, perfectly symmetrical edges. This screams "landscaping project." Natural streams are random. Embrace that.
Skipping boulders. Accent boulders feel expensive. But without two or three of them, the feature looks incomplete. They're the anchor. They make everything else look intentional.
Seasonal Maintenance: A Simple Annual Calendar
A dry creek bed is low maintenance — not no maintenance.
Spring: Walk the full length after winter. Check for displaced rocks. Rake out any accumulated leaf debris. Look for weed seedlings at the edges — pull them now before roots establish.
Summer: Monthly check for weeds between edge rocks. Trim any plants that are spreading into the creek channel itself. Make sure the outlet point is clear.
Fall: This is the biggest maintenance moment. Leaves accumulate fast in rock features. Use a soft-tined rake to loosen, then a leaf blower to push debris to the lawn for collection. Don't use a stiff rake — it displaces rocks.
Winter: Light snowfall is fine. If you're shoveling a nearby driveway, push snow along the creek edge, not directly into the channel — excess weight can shift rocks.
Total time per year: 3 to 5 hours. That's far less than a comparable stretch of lawn or planting bed.
Frequently Asked Questions
Do I need a permit to build a dry creek bed? In most areas, no permit is needed for a residential dry creek bed. But always call 811 before digging, and check local HOA rules. Some municipalities restrict where you can direct water runoff.
Will a dry creek bed attract mosquitoes? Only if it holds standing water. A properly sloped creek with a gravel base drains completely within hours of rain stopping. Standing water means your slope is off — fix the grade.
Can I build a dry creek bed on a flat yard? It's harder, but possible. You'll need to create artificial grade by adding a raised inlet area or connecting to a buried drainage pipe. A landscape professional can help assess if it's practical for your specific yard.
How long does a dry creek bed last? With quality landscape fabric and properly sized rocks, 15 to 25 years easily. The rocks themselves don't degrade. Fabric lifespan is the main variable.
Can I skip the landscape fabric? Technically yes, but you'll regret it. Without fabric, rocks slowly sink into the soil. Weeds grow up through the rocks. Within five years it looks abandoned. The fabric is a $30–$80 material cost that protects everything above it.
What's the difference between a dry creek bed and a French drain? A French drain uses a perforated pipe buried in gravel to move water underground. A dry creek bed manages water at the surface. They're often combined — a French drain feeds water into the headwaters of a dry creek bed.
How do I make the rocks stay in place on a slope? Larger edge rocks act as natural dams that hold smaller stones. On steeper slopes (over 10% grade), bury edge cobbles deeper and consider using a coarser, angular crushed rock for fill instead of smooth river rock — it locks together better.
What's the best time of year to build one? Late spring or early fall. Soil is workable, plants are available for same-season establishment, and you can observe your drainage issue fresh. Avoid building during drought when ground is hard or in late fall when plants can't establish before frost.

Daniel Carter covers the practical side of home improvement at The Dailey House — drainage fixes, DIY yard projects, patio makeovers, and the kind of weekend builds that actually get finished. If there's a smarter or cheaper way to do it, he's tested it.