
Most front yard flower beds fail before a single plant goes in the ground.
Homeowners buy whatever catches their eye at the garden center, dig a rough border along the foundation, drop plants in at random depths, then wonder why it looks patchy by July and completely dead by October. The problem was never the plants. It was the absence of a plan.
This guide follows the same decision sequence professional landscape designers use — structure first, soil second, style third, plants last. Whether your budget is $150 or $1,500, whether your yard gets full baking sun or dense afternoon shade, these steps work. Follow them in order and your bed will look intentional from day one, perform across all four seasons, and require far less maintenance than you expect.
Not sure which planting style suits your front yard yet? Browse our 15 flower bed ideas in front of house for visual inspiration before you start planning.
Before You Start: Two Questions That Determine Everything
Before buying a single plant or picking up a shovel, answer these two questions honestly. Getting either one wrong means everything downstream suffers.
Question 1: How Many Hours of Direct Sun Does the Bed Actually Get?
Walk outside at 10am, 1pm, and 4pm on the same day. Count the hours of unfiltered, direct sunlight hitting the exact area where you plan to plant. Don’t estimate from memory. Observe.
- Full sun: 6+ hours of direct light. The widest plant selection available.
- Part shade: 3 to 6 hours. Many perennials thrive here; sun-loving annuals will struggle.
- Full shade: Under 3 hours. This eliminates roughly 60% of plants at any garden center — which protects both your money and your time.
The real-world mistake: A homeowner on the south-facing side of a brick colonial assumes full sun across the entire front. But the oak tree planted 15 years ago now throws 4 hours of afternoon shade across exactly where she wants lavender. Lavender needs 6+ hours minimum. It dies. Hostas would have thrived in that same spot and cost half the price.
Sun assessment first. Always.
Question 2: How Much Maintenance Can You Realistically Commit To?
This isn’t a question about motivation. It’s a question about your actual schedule from May through October.
A lush cottage-style border looks magnificent. It also needs deadheading, dividing, staking, and pest-checking every two weeks during peak season. A structured Scandinavian bed with ornamental grasses and sedum needs almost nothing after year one. A boho wildflower mix falls somewhere in between.
Honest rule: Choose a style whose maintenance ceiling matches your lowest-energy week — not your most enthusiastic spring Saturday. A beautiful bed that goes neglected for three weeks in August looks worse than a simple one you manage easily.
Step 1: Define the Shape — Before You Dig a Single Inch
Shape is the first impression your bed makes from 30 feet away. It either reads as deliberate or accidental. There is almost no middle ground, and no amount of beautiful planting recovers from a poorly shaped edge.

The most common mistake: Digging first and deciding later. Homeowners grab a shovel, eyeball a rough line along the foundation, and start removing turf. The result is an edge that isn’t curved enough to feel natural or straight enough to feel intentional.
The Hose Trick — Non-Negotiable
Lay a garden hose on the ground to trace your proposed shape. Then do three things most people skip:
- Stand at the street and study it for at least two minutes — not a glance, a proper look
- Sit in your car, parked at the curb, and look again — this is how visitors and buyers first see it
- Take a photo on your phone and review it — the camera reveals what your eye normalizes
If the shape feels wrong from any angle, move the hose. It costs nothing. Regretting a dug edge costs a weekend of backfilling.
Which Shape Matches Your Home’s Architecture
| Shape | Best Architectural Match | Avoid When |
|---|---|---|
| Curved border bed | Cottage, farmhouse, craftsman, colonial, traditional | Home has strong geometric, modern lines |
| Straight rectangular bed | Contemporary, modern, Scandinavian, industrial | Foundation line isn’t level or perfectly straight |
| Asymmetric curved bed | Ranch, split-level, mid-century | You want low-maintenance edging |
| Island bed | Any style — creates a lawn focal point | Lawn area is under 400 square feet |
The Depth Rule Most Homeowners Ignore
A bed only 18 inches deep cannot be layered effectively. You cannot achieve a proper front-middle-back tier structure in under 3 feet. For a typical single-story home, 3.5 to 4.5 feet of depth is the professional sweet spot — wide enough to layer three heights cleanly, narrow enough to reach the back without stepping into the planting.
Real example: A ranch-style home with a 24-foot foundation strip benefits most from a curved bed 4 feet deep at its widest point, tapering to 2.5 feet at each corner. That shape decision alone — before a single plant — makes the front yard look designed.
For more ideas on how shape and layout interact with your full front yard, see our 18 front yard landscaping ideas for proven layout approaches across different home styles.
Step 2: Test and Prepare Your Soil — This Step Is Non-Negotiable
This is the step that separates a bed that thrives for years from one that slowly declines for no apparent reason.

Professional landscapers spend more time on soil preparation than on planting. Most homeowners spend zero time on it. This single difference explains the majority of front bed failures — not plant selection, not watering, not sun exposure. Soil.
How to Test Your Soil (15 Minutes, Costs $10)
Buy a basic soil test kit from any garden center. Brands like Luster Leaf Rapitest are accurate enough for home use. Test for four things:
- pH (target: 6.0 to 7.0 for most flowering plants)
- Nitrogen (N): Drives leafy, vigorous growth
- Phosphorus (P): Supports root development and bloom production
- Potassium (K): Overall plant resilience and disease resistance
For a more comprehensive analysis, send a soil sample to your local county extension office. Most extensions test for under $20 and return a specific amendment recommendation for your exact soil type and location — not a generic guide.
Soil Problem → Solution Reference
| Soil Problem | What You’ll Observe | Correct Fix |
|---|---|---|
| Too acidic (pH below 6.0) | Blueberries thrive; most flowers don’t | Add garden lime, 5 lbs per 100 sq ft |
| Too alkaline (pH above 7.5) | Yellowing leaves despite adequate watering | Add sulfur (1 lb per 100 sq ft) or peat moss |
| Heavy clay | Water pools; slow drainage; hard to dig | Compost + perlite; never till when wet |
| Sandy, fast-draining | Plants wilt quickly despite regular watering | Add 4 inches of compost; install drip irrigation |
| Compacted subsoil | Plants stunt after initial growth; hard pan layer | Break up to 14 inches depth; add organic matter |
⚠️ Drainage warning: If your front bed sits in an area where water pools after heavy rain, solve the drainage issue before planting anything. Waterlogged soil destroys root systems within days. Read our complete guide on how to fix drainage around your house before investing in plants or soil amendments if this applies to your yard.
Standard Soil Prep — Step by Step
- Mark your bed edge with spray paint or flour along the hose outline
- Smother existing grass with flattened cardboard boxes — overlap edges by 6 inches, wet thoroughly. Leave for two weeks if time allows; remove and proceed if not
- Remove dead grass and any remaining vegetation
- Dig down 12 inches — not 6, not 8. Twelve. This is where most root systems establish
- Break up any clay clumps or hardpan layers thoroughly
- Mix in 3 to 4 inches of finished compost throughout the entire bed
- Add slow-release granular fertilizer (10-10-10 or 5-10-5 for flowering plants) per label directions
- Rake to a level, rock-free surface
Budget option: Three to four 40-lb bags of compost at $7 to $9 each, mixed into your native soil, outperforms expensive pre-blended “garden soil” products. The native soil provides mineral structure; the compost provides biology. You need both working together.
Luxury option: Contract a soil amendment service to integrate biochar, worm castings, and a custom compost blend at the correct ratio for your specific soil type. Cost: $200 to $500 for a standard front bed. Return: dramatically faster plant establishment, superior drainage, and reduced irrigation need for years.
Step 3: Choose a Style That Matches Your Home’s Architecture
This is the step most gardening guides skip. It is also the reason most flower beds look like an afterthought rather than a design intention.

The style of your flower bed must extend the architectural language of your home. A Scandinavian-minimalist bed in front of a Victorian home creates visual dissonance that no amount of beautiful plants resolves. A sprawling cottage garden in front of a mid-century modern home looks like two people made two completely separate decisions about the same property.
Architecture and planting style must speak the same design language.
Not sure which design style fits your home and personal taste? Take our interior design style quiz to identify your design direction before committing to a planting scheme.
Modern / Minimalist Style
Best for: Contemporary homes, mid-century modern, new construction, homes with flat rooflines and floor-to-ceiling windows.
Design principle: Restraint is the statement. Every plant earns its place. Bare mulch or gravel between plants is intentional negative space — not a gap to be filled.
Plant picks:
- Karl Foerster ornamental grass — structural, vertical, year-round interest
- Blue Oat Grass — low, silver-blue, effectively zero maintenance
- Black-eyed Susans planted in tight geometric clusters, never scattered randomly
- Yucca or architectural agave (USDA zones 7 and above)
- Low boxwood as a repeating structural element
Color palette: White blooms, deep purple, silver-grey foliage. Maximum three colors. Avoid pastels — they read as soft against the strong geometry of modern architecture and disappear from street view.
Layout principle: Groups of odd numbers only — three plants of one type, five of another, one statement specimen. Even-numbered groupings create inadvertent symmetry that reads as poorly executed balance from the street.
Common mistake: Adding one more colorful element “to liven it up.” The restraint is the design. Resist.
Cottage / English Garden Style
Best for: Victorian, craftsman bungalow, Cape Cod, farmhouse, older homes with decorative trim, covered porches, or asymmetric facades.
Design principle: Controlled abundance. The bed should look as though it grew naturally — while being completely intentional in its underlying structure.
Plant picks:
- Lavender along sunny front edges — drought tolerant, pollinator magnet, fragrant from April through August
- Echinacea in purple and white — blooms June through September, seed heads feed birds in winter
- Salvia nemorosa for deep vertical color and long bloom period
- Sweet alyssum along the front edge — self-seeds beautifully, softens the border line
- Climbing roses against the foundation — always use a trellis; never allow canes to contact siding directly
Color palette: Soft pinks, creamy whites, dusty purples, warm yellows. Allow plants to mingle at their edges — hard delineation between plant groupings breaks the cottage illusion and makes the bed look like a collection rather than a composition.
Layout principle: Plant in drifts. A drift is a diagonal sweep of 5 to 7 plants of the same type moving across the bed at an angle. Drifts create the flowing, layered effect that defines the cottage style and makes the eye travel across the entire bed rather than stopping at each individual cluster.
Boho / Eclectic Style
Best for: Craftsman bungalows, Spanish mission homes, older neighborhoods with mature street trees, any home where personality takes precedence over polish.
Design principle: Texture over uniformity. Movement — plants that sway and shift in the wind — is a deliberate feature. The bed should feel alive, slightly untamed, and unapologetically abundant.
Plant picks:
- Ornamental allium — dramatic purple globes on tall stems; extraordinary in late May and June
- Rudbeckia for golden vertical color through August and September
- Fountain grass for visible movement and soft sound in wind
- Verbena bonariensis — tall, airy, semi-transparent; plant it behind other plants and it appears everywhere
- Native wildflowers appropriate to your specific region — contact your local native plant society for the correct species by zone
Color palette: Burnt orange, gold, deep burgundy, dusty pink, terracotta. Think the color palette of late afternoon light in early September.
Layout principle: Vary heights dramatically and without apology. Low creeping groundcovers at the front edge, mid-height perennials through the center, tall grasses and bold specimen plants at the back. The vertical variation creates depth even in a shallow bed.
Scandinavian / Nordic Style
Best for: Contemporary homes, simple ranch homes, townhouses, any home where you want the architecture to be the statement — not the garden.
Design principle: Structure, restraint, and year-round form over seasonal flower show. This style looks most expensive and requires least maintenance after establishment. It is the best choice for homeowners who want a sophisticated front bed but genuinely don’t enjoy gardening.
Plant picks:
- Low-growing Sedum — groundcover, drought tolerant, turns deep copper-red in fall
- Ornamental kale for October through January interest when everything else has died back
- White Japanese anemone — blooms September through October when the wider garden world has given up
- Hostas in partially shaded areas — the textural anchor of Nordic-style planting
- One architectural focal specimen: Dwarf Alberta Spruce, Little Lime hydrangea, or a single weeping ornamental cherry
Color palette: White, pale green, grey-green foliage, black mulch ground. Avoid warm tones completely. The palette should feel like overcast November light — serene, not cold.
Layout principle: Dark mulch is not optional in this style — it is part of the design itself. The contrast between dark decomposed granite or black bark mulch and pale, textural plants creates the signature high-contrast look that makes this style read as expensive and deliberate.
Step 4: Layer Your Plants Like a Professional Designer
Layering is the single technique that separates a polished, designed flower bed from a random grouping of plants that all happen to be in the same area. It is also the technique most homeowners completely skip.

The Three-Tier Rule
Every professionally designed flower bed applies some version of this height structure, regardless of style:
Back layer — 3 to 5 feet tall: The vertical backdrop. Ornamental grasses, tall perennials, structural shrubs, or climbing plants against the foundation. These define the scale and height of the entire bed.
Middle layer — 1 to 2.5 feet: The primary color show. Most flowering perennials and mid-height annuals live here. This is what the eye finds first from the street.
Front edge — under 12 inches: The finishing detail. Groundcovers, creeping plants, low annuals, or a defined edging species that softens the transition from bed to lawn and creates a clean visual termination line.
Spacing: The Rule That’s Hardest to Follow in Year One
Most homeowners plant too close together because a correctly spaced bed looks sparse in the first growing season. This is the trade-off stated plainly:
A properly spaced bed looks sparse for one growing season and looks professional for the next ten.
Check the mature spread listed on every plant tag. If Karl Foerster grass spreads to 24 inches at maturity, plant it 24 inches from its neighbor — not 10 inches because there’s a visible gap. Fill that gap with inexpensive annuals in year one. By year two, the perennials will have closed it themselves.
A Working Layering Example (4-Foot Bed, Zones 4 to 8, Full to Part Sun)
| Tier | Plants | Spacing |
|---|---|---|
| Back | 3 × Karl Foerster grass | 30 inches apart |
| Middle | 5 × Echinacea purpurea + 3 × Salvia nemorosa ‘Caradonna’ | Alternating, 18 inches |
| Front edge | Continuous sweep of Creeping Phlox or White Sweet Alyssum | 12 inches |
| Year-one gap filler | Zinnias or marigolds between perennials | As needed |
Step 5: Build a Color Plan That Reads From the Street
Color planning feels overwhelming until you understand that almost any palette works if it follows one of three structural approaches. Random color — one plant from every section of the garden center — almost never works. A deliberately limited palette almost always does.
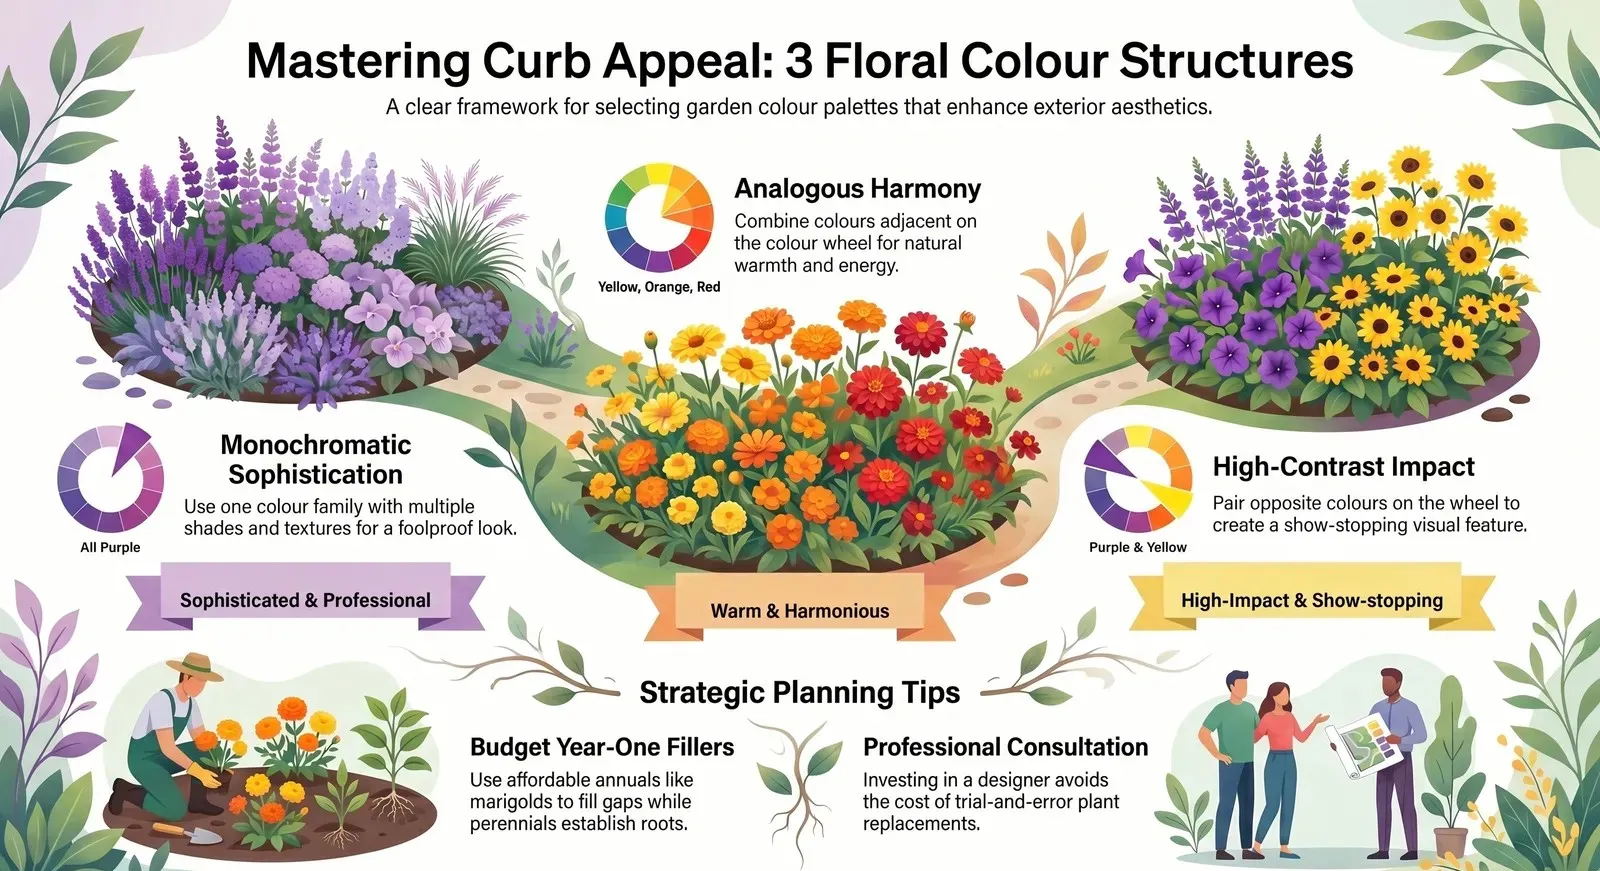
Three Foolproof Color Structures
Monochromatic: One color family, multiple shades and textures. All-purple: pale lavender alyssum at the front edge, medium purple echinacea through the middle, deep violet salvia at the back, silver sage foliage woven throughout. This approach is sophisticated, reads cleanly from the street, photographs well in all light conditions, and is almost impossible to execute poorly.
Analogous: Two to three colors that sit adjacent on the color wheel — yellow, orange, and red together; or blue, purple, and pink together. Colors in an analogous relationship share underlying tones, so they naturally harmonize without careful management. This approach adds warmth and visual energy without becoming chaotic.
High contrast: True opposites — purple and yellow, blue and orange. The show-stopping approach. High contrast reads clearly from 50 feet away, photographs brilliantly, and creates beds that stop pedestrians. Use this when you want the flower bed to be the single dominant visual feature of the front exterior.
Budget color strategy: Fill year-one gaps between establishing perennials with marigolds, zinnias, or petunias — $3 to $5 per pack, season-long color. Pull them in fall. By year two, perennials will have filled the space themselves.
Luxury color strategy: A one-hour consultation with a local landscape designer runs $150 to $400. Many will walk your yard, assess sun conditions, photograph the home exterior, and return a specific plant list organized by color, bloom sequence, and mature size. For a first-time front bed, this investment recovers its cost in avoided plant replacements alone.
Unsure which color palette works best for your home’s exterior tones? Try our room colour palette quiz — the same principles that govern interior colour harmony apply directly to exterior planting palettes.
Step 6: Plant Correctly — The Technique Most People Get Wrong
Beautiful soil, a clear style, and a color plan come to nothing if the plants go in incorrectly. Planting errors cause more first-year bed failures than any other factor — more than incorrect plant selection, more than poor watering, more than sun miscalculation.
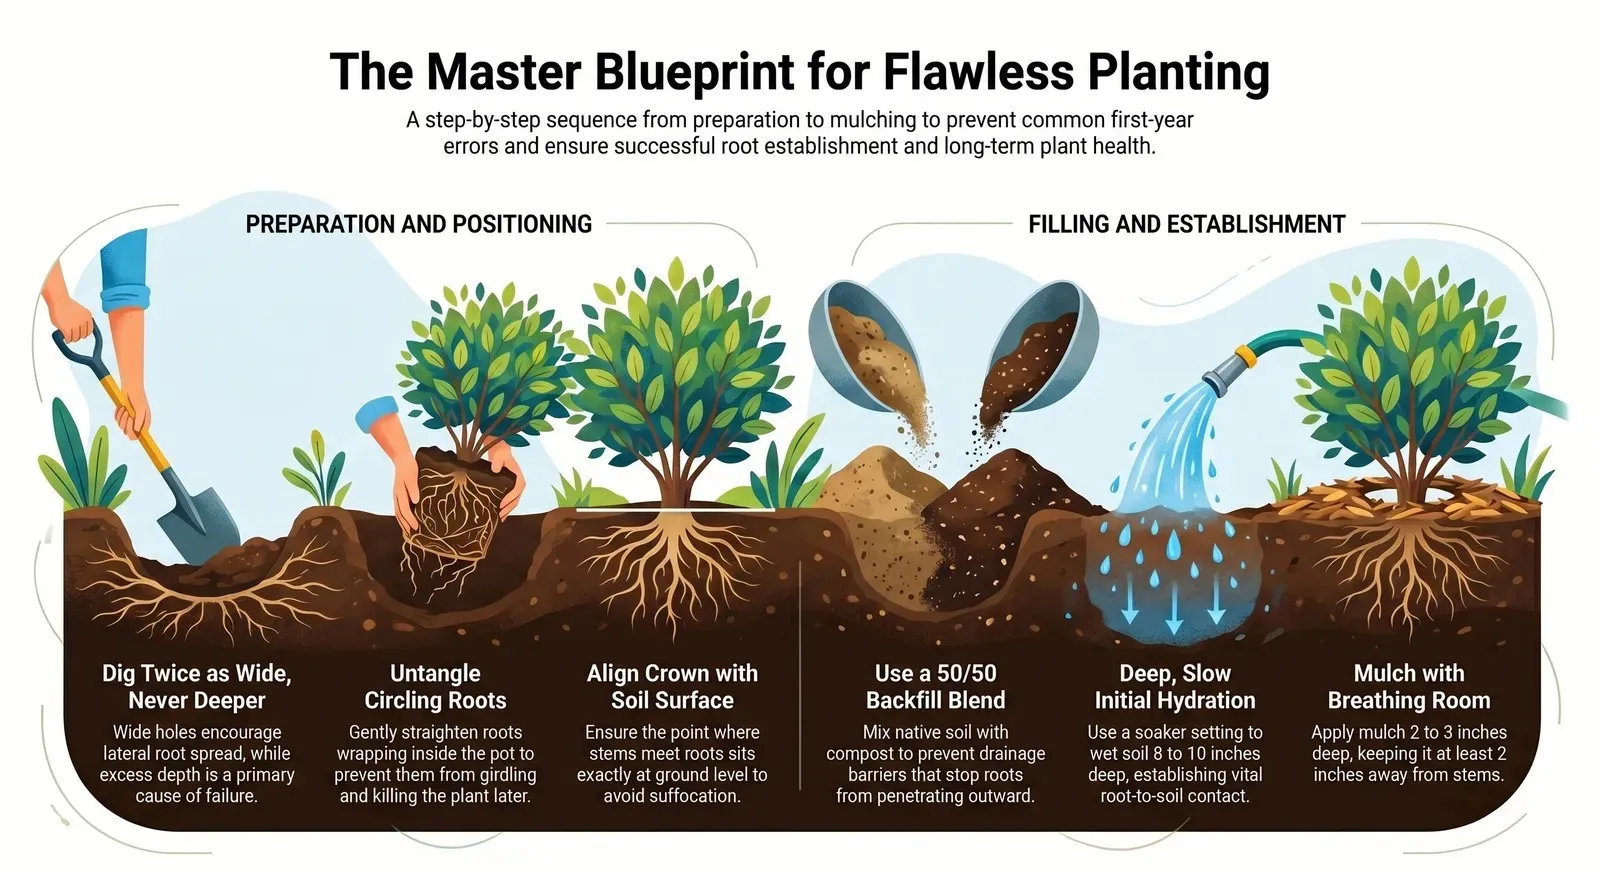
The Correct Planting Sequence
1. Water container plants thoroughly one hour before planting. Moist root balls hold together when you remove the pot. Dry root balls fall apart and expose root tips to air. Water an hour ahead — not immediately before.
2. Dig the hole twice as wide as the root ball, same depth — never deeper. Width encourages lateral root spread into surrounding soil. Depth is where most errors occur. A hole that’s too deep buries the crown and almost guarantees slow death.
3. Check for circling roots before setting the plant. If roots have been wrapping around the inside of the container, loosen and straighten them gently with your fingers before the plant goes in. Circling roots continue circling in the ground. Over three to five years they girdle the plant and kill it. This correction takes 30 seconds and prevents years of unexplained decline.
4. Set the crown exactly at soil level. The crown — the point where stems meet roots — must sit flush with the surrounding soil surface. Not sunken below it. Not raised above it. Sunken crowns accumulate moisture and rot. This is the single most common planting error in residential flower beds.
5. Backfill with a 50/50 mix of native soil and compost. Do not backfill with straight compost, potting mix, or any pure organic material. Pure organic backfill creates an interface boundary that roots hit and stop at rather than penetrating outward. Native soil provides the mineral continuity roots need to extend into the surrounding ground.
6. Firm the soil by hand — never by foot. Work your hands around the root ball in a slow circle, pressing firmly enough to eliminate air pockets without compacting the surrounding soil. Foot pressure compacts too aggressively.
7. Water deeply and slowly immediately after planting. Use a soaker or gentle shower setting, never a jet. Apply enough water to wet the soil 8 to 10 inches deep — you are establishing the critical moisture connection between root ball and surrounding soil. A light mist accomplishes nothing at root level.
8. Mulch immediately after watering. Two to three inches deep. Keep mulch at least 2 inches away from all plant stems — mulch piled against stems traps moisture and creates the conditions for crown rot.
Step 7: Mulch Is Infrastructure — Treat It That Way
Homeowners who think of mulch as decoration — applied for appearance — water twice as frequently and weed three times as often as homeowners who understand what mulch actually does below the surface.
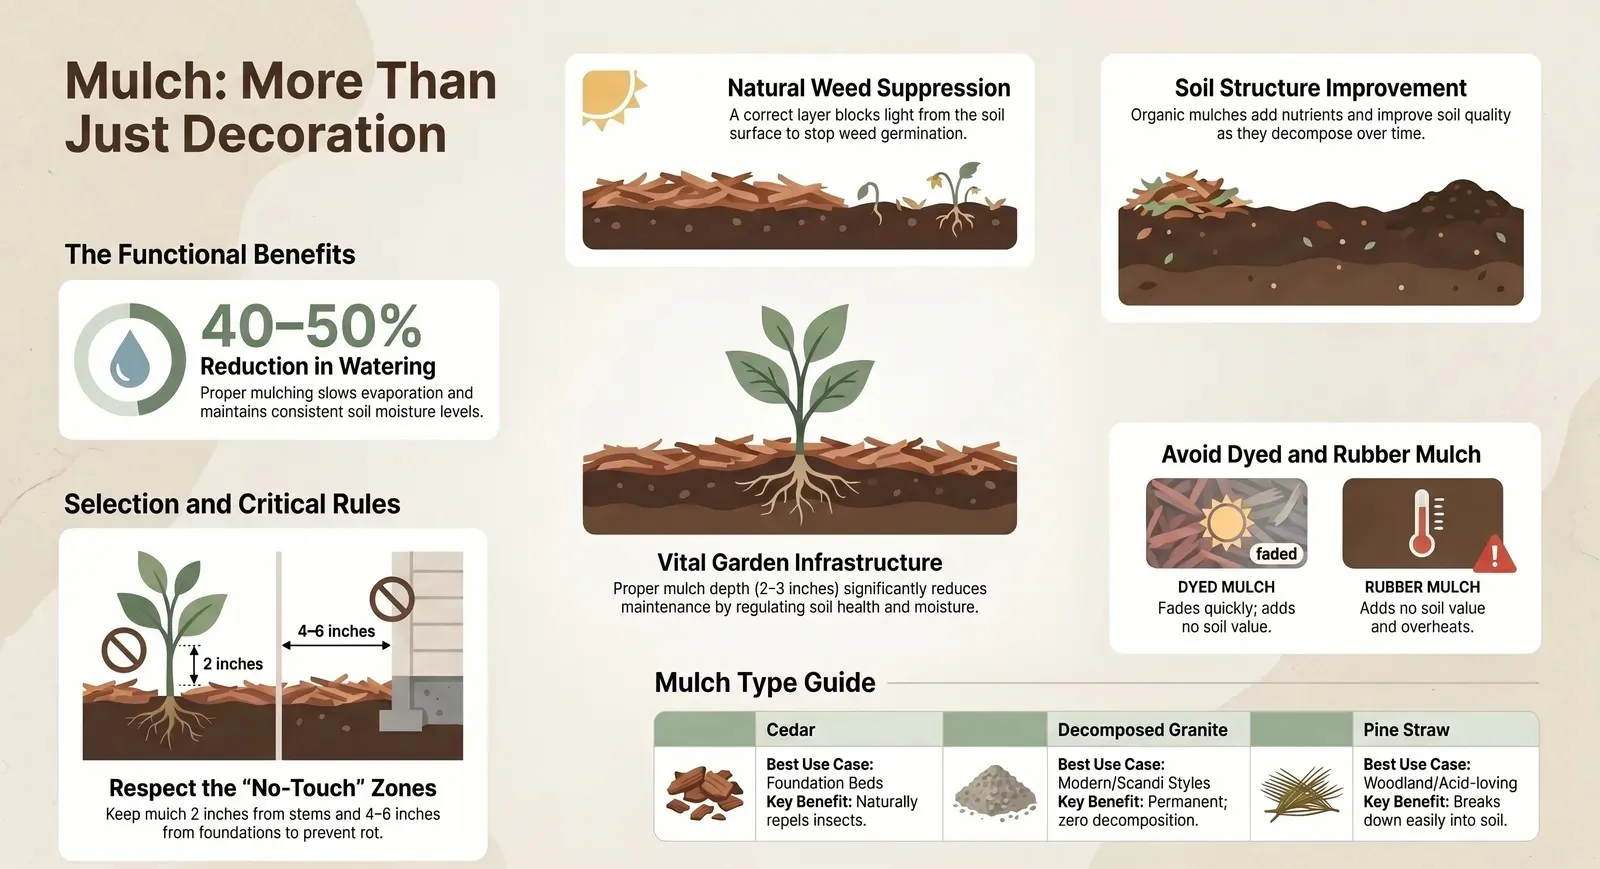
A correctly applied 2 to 3 inch mulch layer:
- Reduces watering frequency by 40 to 50% by slowing evaporation from the soil surface
- Maintains soil temperature within the range that benefits most perennial root systems through heat spikes and cold snaps
- Suppresses weed germination by blocking light from reaching the soil
- Improves soil fertility and structure as organic mulch decomposes — particularly relevant for bark mulch, leaf mold, and compost-based products
Mulch Selection by Style and Function
| Mulch Type | Best Style Match | Key Notes |
|---|---|---|
| Dark bark mulch | Universal | Affordable, decomposes slowly, widely available |
| Cedar mulch | Cottage, farmhouse | Naturally repels insects; well-suited for foundation beds |
| Decomposed granite | Modern, Scandinavian | Permanent; zero decomposition; adds no nutrients but needs no refresh |
| Cocoa shell mulch | Boho, premium cottage | Excellent finish; toxic to dogs — do not use if you have pets |
| Pine straw | Cottage, woodland, shade beds | Best for acid-loving plants; decomposes into beneficial organic matter |
| Black or red dyed mulch | Not recommended | Fades unevenly within 4 to 6 weeks; looks worse than no mulch after midsummer |
| Rubber mulch | Playgrounds only | Gets extremely hot in full sun; adds no soil value; not appropriate for planting beds |
Critical application rules:
- Keep mulch at least 2 inches away from all plant stems — moisture trapped against stems causes crown rot
- Keep mulch at least 4 to 6 inches away from your home’s foundation — mulch against foundation walls retains moisture against concrete and can compromise waterproofing over time
- Never exceed 3 inches of depth — thick mulch layers prevent adequate oxygen and water penetration to the root zone
Step 8: Set Up Irrigation That Matches the Scale of Your Bed
Hand watering a front flower bed feels satisfying the first week after planting. By mid-August in most climates — when temperatures are high, schedules are full, and the bed needs consistent moisture most — it becomes the primary reason beds struggle and homeowners give up.
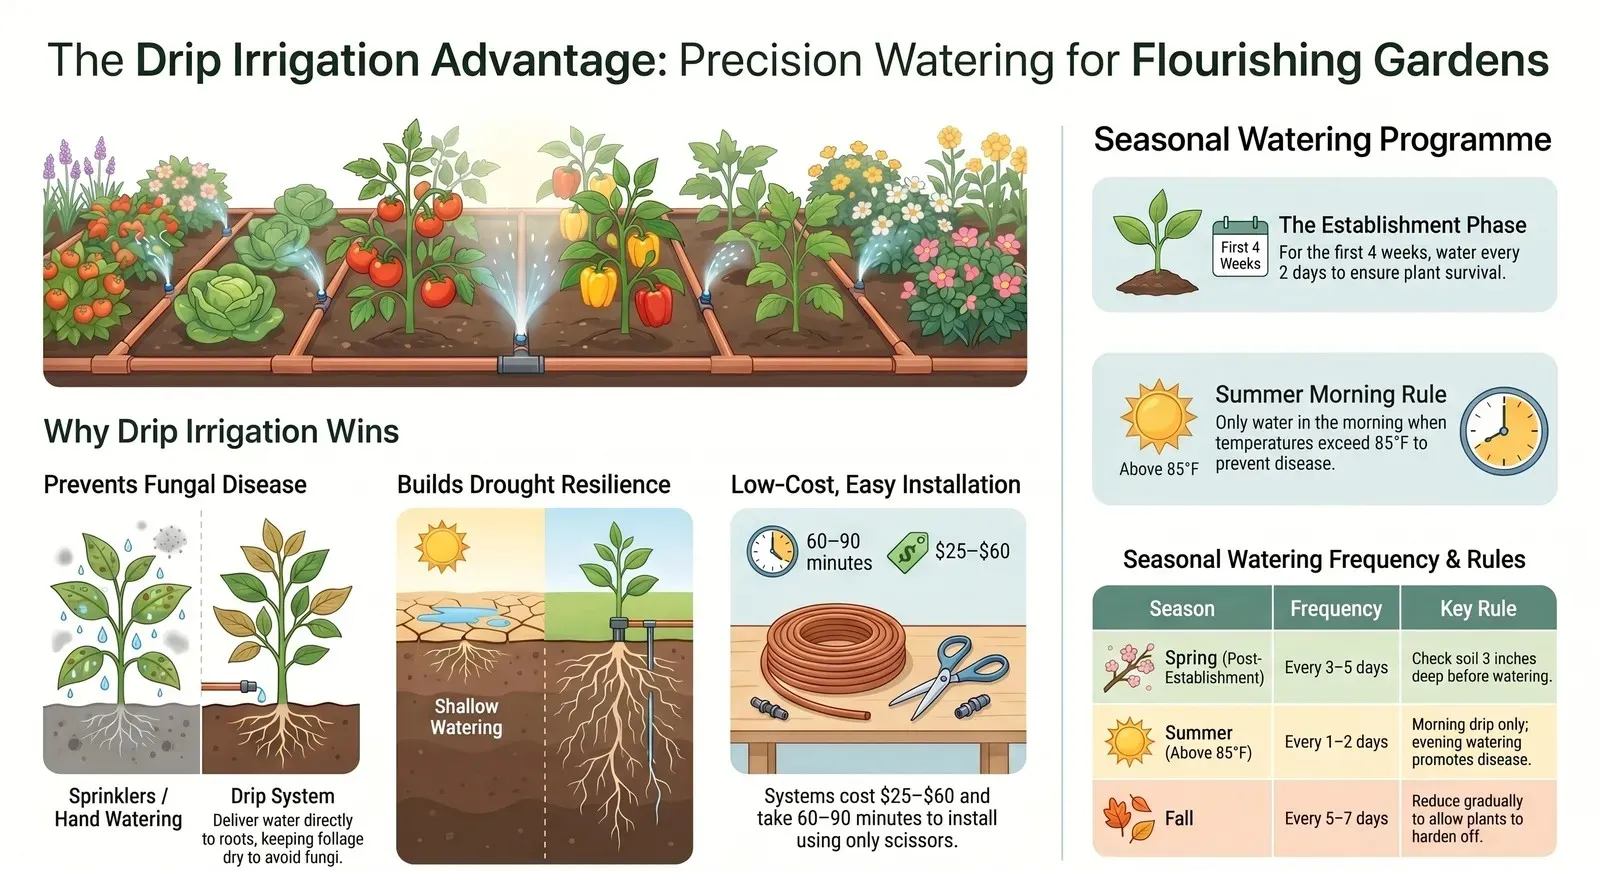
The Drip System Case
For any bed longer than 8 linear feet, a drip irrigation system is the highest-return investment in your entire project. The case for it is not about convenience — it’s about plant physiology:
- Drip systems deliver water directly to the root zone, never to foliage. Wet foliage in evening hours is the primary cause of fungal disease in residential flower beds.
- Drip systems on timers deliver consistent moisture regardless of your schedule, rather than the irregular “remembered to water today” cycle that stresses and weakens plants
- Deep, infrequent drip watering encourages roots to grow downward — which makes plants genuinely drought tolerant. Frequent light watering trains roots to stay at the soil surface, where they’re vulnerable to heat, drought, and temperature swings
A basic drip conversion kit — Raindrip and DIG both make reliable beginner systems — attaches to any outdoor hose bib and covers a 25-foot bed. Installation takes 60 to 90 minutes with no tools beyond scissors.
A basic drip kit for a 20-foot bed costs $25 to $60. The time saved in the first summer alone is worth more than that.
Watering Reference by Season
| Season | Frequency | Method | Key Rule |
|---|---|---|---|
| Spring (weeks 1 to 4 post-planting) | Every 2 days | Deep, slow | Establishment phase — critical; do not skip |
| Spring (after establishment) | Every 3 to 5 days | Drip or deep hand water | Check soil 3 inches deep before watering |
| Summer (above 85°F) | Every 1 to 2 days | Morning drip only | Evening watering promotes fungal disease |
| Summer (below 85°F) | Every 3 days | Morning only | Consistent deep watering beats frequent shallow |
| Fall | Every 5 to 7 days | Any time of day | Reduce gradually; allow plants to harden off |
| Winter | Only during extended drought | Spot water at midday | Dormant roots need minimal moisture |
Step 9: Plant for Four Seasons — Not Just June
A front bed that looks spectacular in June and completely dead by September is not a successful bed — it’s a half-finished one. Planning four-season interest is not complicated. It requires selecting plants in each of four seasonal slots before you buy anything. If any slot is empty, your bed goes dormant for that season.

Four-Season Planting Reference
Spring — March to May: Tulips, daffodils, alliums, bleeding heart, creeping phlox, Virginia bluebells. These carry visual interest when everything else is just emerging from dormancy.
Summer — June to August: Echinacea, black-eyed Susan, lavender, salvia, daylilies, zinnias as annual filler. Peak season — most plant selection defaults to this window, which is why fall and winter so often get overlooked.
Fall — September to November: Sedum ‘Autumn Joy’ turning deep copper-red, ornamental grasses with mature seed heads, rudbeckia continuing through October, asters, ornamental kale. These carry the bed when every neighboring yard looks tired and abandoned.
Winter — December to February: Ornamental kale persisting through frost, dwarf evergreen shrubs providing permanent form, red-twig dogwood grown for its vivid red winter stems, ornamental grass seed heads left standing. The standing dried seed heads also provide food for songbirds through the coldest months — which is both ecologically valuable and visually engaging from inside the house.
Planning shortcut: Before purchasing a single plant, create a four-column list — one per season. Assign every plant you’re considering to a seasonal column. If any column is empty, your bed will go visually dormant for that period.
For container-based seasonal color to complement your front bed across all four seasons, our 20 front porch flower pot ideas pairs directly with this step — pots give you flexibility to rotate seasonal plants without disturbing your permanent planting.
Step 10: Maintain the Bed Without Burning Out
A well-designed bed with correctly prepared soil, appropriate plant spacing, and 2 to 3 inches of mulch in place requires genuinely less maintenance than most homeowners expect. The work front-loaded into soil prep, correct planting, and proper spacing pays back in reduced hours for years.
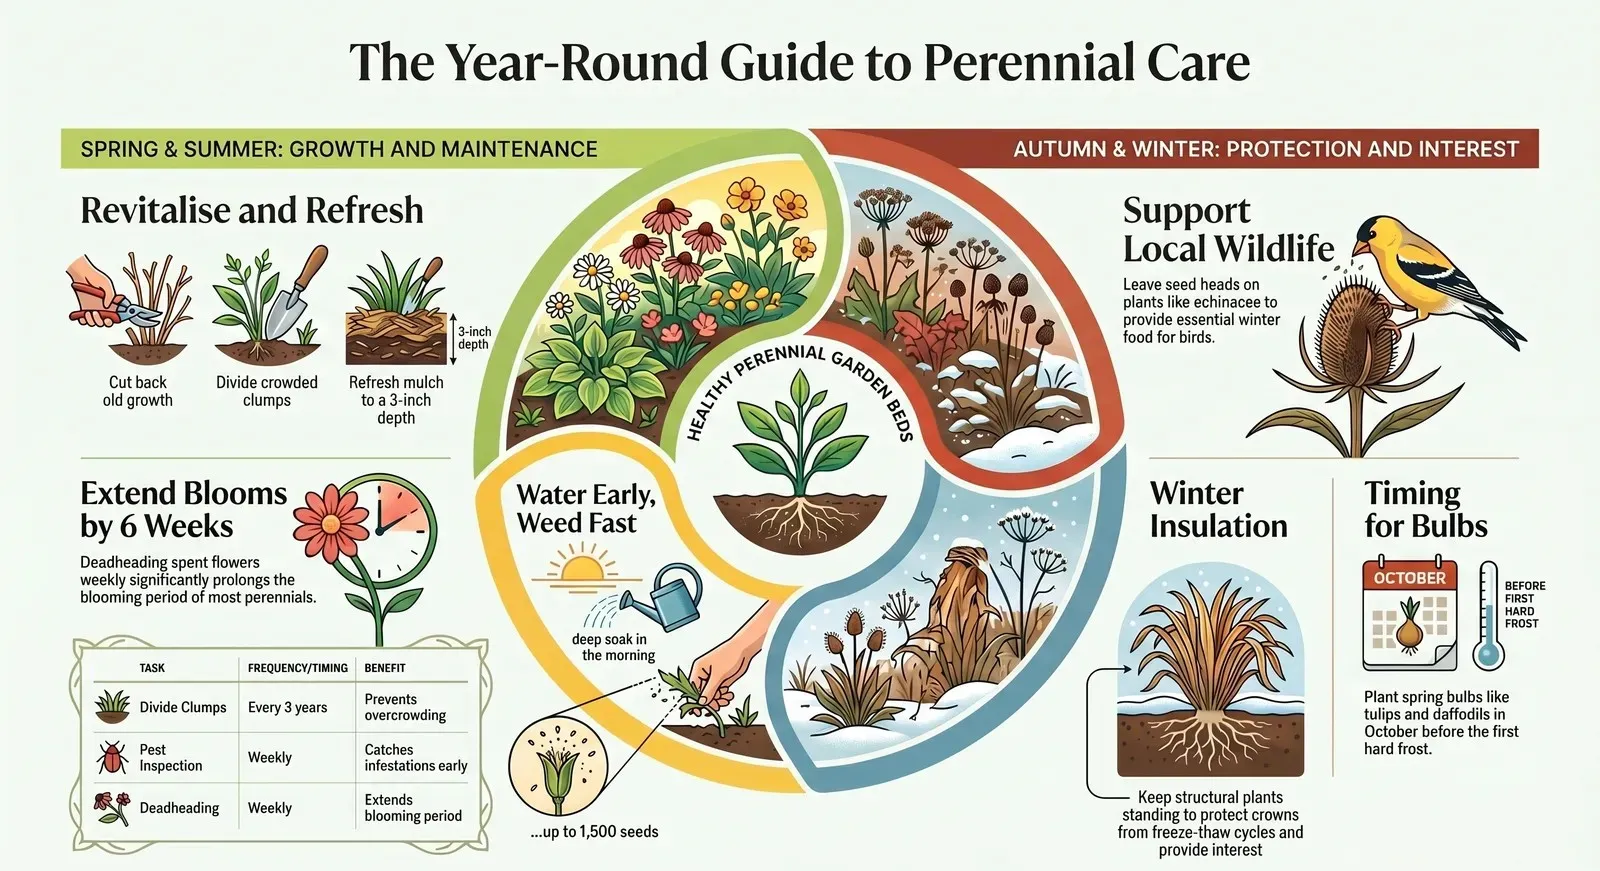
Seasonal Maintenance Checklist
Spring — March to April:
- ☐ Cut ornamental grasses to 4 to 6 inches before new growth emerges (late February in zones 6+; late March in zones 4 to 5)
- ☐ Cut back perennials to 3 to 4 inches once new growth is visible at the base
- ☐ Divide overcrowded clumps — coneflowers and black-eyed Susans benefit from division every 3 years
- ☐ Restore mulch depth to 2 to 3 inches
- ☐ Apply slow-release granular fertilizer (Osmocote or equivalent)
- ☐ Re-edge the bed perimeter with a half-moon edger or flat spade
Summer — May to August:
- ☐ Deadhead spent blooms weekly — this extends the bloom period of most perennials by 3 to 6 weeks
- ☐ Inspect for aphids, spider mites, and Japanese beetles weekly — early detection prevents infestations from spreading
- ☐ Water deeply in the morning only; never in the evening
- ☐ Pull weeds before they set seed — one thistle produces approximately 1,500 viable seeds
Fall — September to November:
- ☐ Leave seed heads on echinacea, rudbeckia, and ornamental grasses through winter — they feed goldfinches and other seed-eating birds
- ☐ Plant spring-flowering bulbs in October before the first hard frost
- ☐ Pull annuals after the first frost; they will not recover and become a decay and pest habitat if left
- ☐ Apply a final 1-inch refresh of mulch before ground freeze
Winter — December to February:
- ☐ Leave structural plants standing — dried stems and seed heads provide winter visual interest and insulate crowns through freeze-thaw cycles
- ☐ Do not cut ornamental grasses until late February or early March (they protect the crown through winter)
- ☐ Note bare spots and make a spring replanting list while the structure of the bed is visible
Real Cost Breakdown — What a Front Bed Actually Costs
One of the most consistent frustrations homeowners have with gardening content is vague or aspirational cost guidance. Here is a specific breakdown for a 20-foot-long, 4-foot-deep front bed:
| Element | Budget Version | Mid-Range | Luxury Version |
|---|---|---|---|
| Soil prep (compost + fertilizer) | $35–$50 DIY | $80 professional amendment | $200–$400 soil service with biochar |
| Plants | $60–$100 (annuals + 3 perennials) | $150–$250 (mixed perennial selection) | $400+ (mature perennials + specimen shrub) |
| Mulch | $25–$40 (dark bark, 10 bags) | $60–$90 (cedar or cocoa shell) | $150+ (decomposed granite, bulk delivery) |
| Edging | $15 (plastic landscape edging) | $35–$50 (aluminum edging) | $80–$150 (corten steel edging) |
| Irrigation | $20–$30 (soaker hose) | $40–$60 (basic drip kit with timer) | $150–$300 (drip system with smart controller) |
| Total | $155–$240 | $365–$540 | $980–$2,000+ |
What each level actually buys: The budget version looks beautiful at peak season in year two. The mid-range version looks designed from year one. The luxury version looks like a professional installed it on day one and requires the least annual input to maintain.
The Five Most Expensive Mistakes in Front Bed Planting
These are not cautionary asides — they are the five errors that appear most consistently in beds that fail within two seasons:
1. Skipping the soil test. Planting $200 worth of premium perennials into soil with a pH of 5.2 means your plants will perform as though they cost $20. The $10 test kit pays for itself before you buy a single plant.
2. Planting too close together. The bed looks full for one season. By year three, strong plants crowd out weaker ones, air circulation drops, disease spreads, and the bed looks unplanned — because at the spacing level, it was.
3. Planting the crown too deep. The single most common cause of unexplained first-year plant death. The crown sits below soil level, moisture accumulates against it, rot follows. The plant may survive the first summer and die over winter or in the following spring.
4. Choosing plants before choosing style. The result is a bed where individual plants are beautiful and the overall composition is visually incoherent. Style determines plant selection. Never the reverse.
5. Planning only for peak season. A front bed that peaks in July and goes fully dormant by September makes your front yard look abandoned for six months. Plan all four seasonal slots before purchasing anything.
Final Thought: Design for the Yard You Actually Have
The best front yard flower bed is not the one in the Pinterest board you’ve been collecting for three years. It’s the one that works with your actual sun exposure, your actual soil chemistry, your home’s architecture, your USDA hardiness zone, and — most importantly — the maintenance time you will realistically give it in the third week of August.
Get the soil right. Choose a style that extends your home’s architecture. Layer plants across three tiers. Plan for all four seasons. Install irrigation before you need it.
Do those five things and your front yard will stop looking accidental.

Sophia Turner covers budget home decor, seasonal styling, and outdoor spaces at The Dailey House. She has a talent for finding thrift store pieces that look like they cost three times what she paid, and a habit of redesigning her front porch every single season.